
In this tutorial, I share my workflow on how I add and manage web articles in Obsidian. This guide includes setting up the Web Content note using Templates and QuickAdd, displaying all the notes using Dataview, and more!
Table of Contents
- Things Needed
- The Folder Structure I Use
- How to Create the Web Content using a Template
- Parts of My Web Content Note
- How to Add a New Web Content Note using QuickAdd
- How to Create the Master List Note
- Download the Sample Vault
- Credits
Things Needed
The Folder Structure I Use

Just like with my daily notes, I use folders to keep the web content in place. All of these notes are inside a main folder called “Interesting Stuff”.
“Interesting Stuff” is the term I use for saved web content in Obsidian. It helps me distinguish what content to save in Obsidian to prevent the dreaded Collector’s Fallacy. Feel free to use a different term if you like.
- 📂 _templates
- This is the folder that houses the Web Content template. I’ve put an underscore so that this folder appears on top of the navigation panel.
- 📂 Interesting Stuff
- This is the main folder that houses the following subfolders below:
- 📂 Articles
- This folder houses all the kinds of web articles.
- 📂 Book Summaries
- This is a more specific folder that houses the articles that serve as book summaries such as the ones from StoryShots or Shortform.
- 📂 Threads
- This folder includes tweets and long threads from Twitter. Reddit posts and forum threads also fall under this folder.
- 📂 Videos
- This usually houses YouTube videos. If a video is part of a course, then it falls under a separate Course folder.
How to Create the Web Content Note using a Template

I use the Templates core plugin to automatically fill in the content of the web content note.
Here are the steps to configure and set up the note to create the template:
- Create a folder called
_templates. This will house the templates used for your book notes. - Click on the Settings button on the bottom left corner and select Core Plugins. Turn on Templates to enable this plugin.
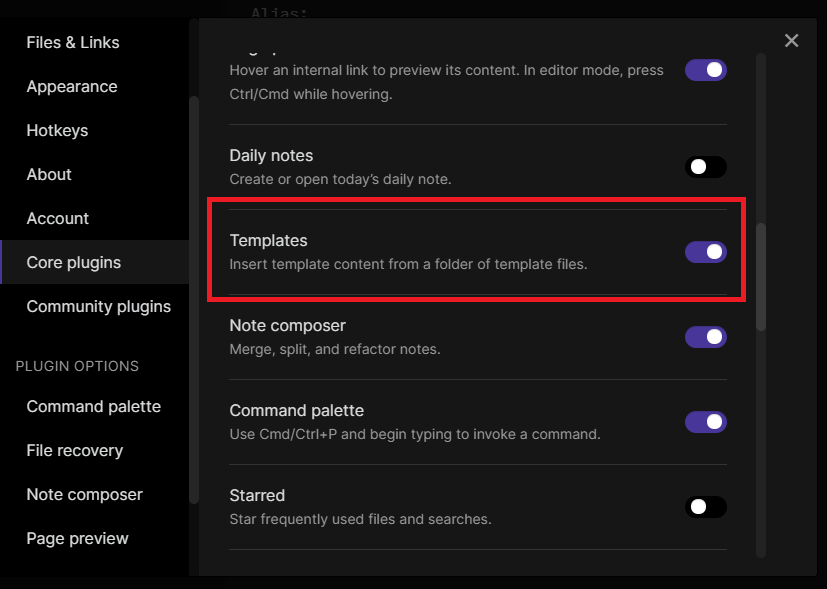
- Look for Templates under Plugin Options.
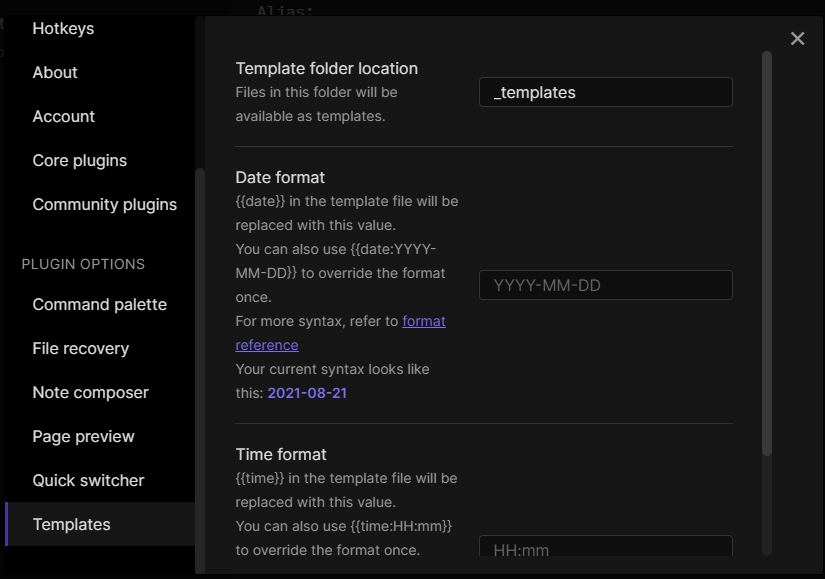
- Set the template folder location to
_templates.
- Create a new note and name it “Web Content Template”. Type the following on the note:
--- Type: Author: Topic: --- # {{NAME}} - Metadata: - Author: `= this.Author` - Link:: []() - Tags:: #interestingstuff/unread## 🖊️ Literature Notes — ## ⚫ Bullet Outline — ## 📑 Highlights — # 📰 Full Text — |
Parts of My Web Content Note
In this section, I explain each part of my web content note including the YAML frontmatter values I use and headers to sort the content out.
Type

This is where I indicate if the web content is either an article, thread, book summary, or video.
Author

This is where I specify the author of the web content. If the web content has multiple authors, you can format it like this: [Author1, Author2].
The ‘= this.Author ‘ code on the Metadata bullet allows you to display the name of the author in the YAML frontmatter without manually copying it over.
Topic

This is where I indicate the topic of the web content. Just like with the Author YAML frontmatter, you can use this format: [Topic1, Topic2, Topic3] when including multiple topics.
Link

This is where I put the URL of the web article or video. I prefer placing this as an inline dataview query language (DQL) so as URLs with the name of the publication or platform.
Name

The name is where I put the title of the article or video. If the title has a colon (:), I replace it with a dash (-).
If it’s a tweet or a thread, I usually make it a sentence that tells what the tweet is all about and includes the name of the user.
For example, here is a thread that talks about the myth of achieving photorealism without using photo references.
If I were to add it as a note, I would title it “Greg Smallwood on the Myth of Achieving Photo Realism without Photo Reference”. It might be a bit wordy but this helps me immediately tell the topic of the thread just from its title.
Tags

I use tags to specify the status of the web content note. Below, you can see all the tags that I use for these kinds of notes.
#interestingstuff/unread- This is the tag I use for unread web content. Although lately, I’ve been moving my unread and to-read content outside of Obsidian to reduce the number of orphaned notes (notes with no links) in my vault. I’ve been using a combination of Google Keep and Capacities to store web content that I want to read later.
#interestingstuff/read- This is the tag I use for web content that I’ve read.
#interestingstuff/nolitnote- This is the tag I use to indicate if the note has no literature notes. I don’t always create literature notes out of every web content I consume. Productivity for its own sake isn’t something I want to achieve.
#interestingstuff/litnoteprocessed- This is the tag I use to indicate if the note has literature notes.
#interestingstuff/clippings- This is the tag I use to indicate if the note has the entire clipping of the web content.
#interestingstuff/spicysource- This is essentially the “favorites” tag. I use this for notes that I want to go back to re-read and learn again.
Literature Notes

This is the section where I include the literature notes I’ve gathered based on what I’ve learned from the web content and are written based on my own words.
There’s no fixed rule that I use when making literature notes, so sometimes I keep them within the note or refactored them into their own note using the Note Refactor plugin.

It all boils down to the type of web content: for how-to tutorials, it’s best to keep it within the note while articles that tackle different topics would be better suited for the latter method.
Bullet Outline

There are cases where I prefer using the bullet outline when making notes. Just like with the literature notes, I write these using my own words and keep each bullet short so it doesn’t feel like a slog when reading through it.
Highlights

This is the section where I paste the highlights that I’ve copied from Glasp. Glasp is the main app I use for highlighting web content such as articles and videos and pasting them to Obsidian.
Full Text

In rare cases where I clip the entire web article, I put it under this header. I use a browser extension called MarkDownload (Firefox/Chrome) to copy from the clipboard and then paste it under this header.
For Twitter threads, I use Thread Reader to unroll the thread and use MarkDownload to copy and paste the contents.
How to Add a New Web Content Note using QuickAdd
| ❗ Note: This section uses the same steps used to create the book note from my bookshelf tutorial. If you already know how to set up and use QuickAdd, feel free to skip this part and move on to the “How to Create the Master List” section |
QuickAdd is a plugin that lets you quickly add templates and new content to your vault. Using this plugin allows you to add a new book note from the command palette instead of adding a new note, applying the template, and moving it to the folder (saving you three or more clicks!)
Setting Up Quick Add
- Go to Settings and look for QuickAdd under the Community Plugins.

- On the textbox, add a name for the command (I use “Add Web Content”) and then click Add Choice.

- Click on the gear icon to open up the settings of the Add Web Content command.

- On Template Path, select the Web Content Template you just made.

- Turn on Create in folder and Choose folder when creating a new note in the Settings. This allows QuickAdd to give an additional prompt asking you where to put the note in a specified folder.

- Optional: Click the toggle on the Open and New Split if you want QuickAdd to open up the newly added book in either a vertical or horizontal tab.

- Optional: Click on the lightning bolt icon to add a shortcut to this command on the Command Palette.

How to Use QuickAdd

Once you’ve set up the QuickAdd command, open the Command Palette (or press Ctrl + P) and type QuickAdd. Select the Add Web Content command.
A new window will pop up after clicking on the Add Web Content command. Specify the folder location and type the name of the web content to create a new note with the Web Content Template applied.
How to Create the Master List Note

In this section, I’ll explain two ways to create the “master list” for your web content.
Display All Web Content

- Create a new note called Web Content Library. Make sure to put the note outside of the Interesting Stuff folder.
- Add the following Dataview code below in the Web Content Library note. Make sure to add three backticks (‘) at the start and end of the code for it to work:
| dataview table Author, Link from “Interesting Stuff” |
Here is a line-by-line explanation:
table Author, Link- This tells the Dataview plugin to create a table displaying three columns: the title of each note, the author, and the link of the web article.
from "Interesting Stuff"- This tells the Dataview plugin to specifically display notes from the Interesting Stuff folder.
- If you want to only show web articles, you can use this code:
from "Interesting Stuff/Articles"
Group Web Content Based on Topic
Automatic Approach

To group and display web content based on the topic, add a single line of code from the previous Dataview code shown. Your code should look like this:
| dataview table Author, Link from “Interesting Stuff” where contains(Topic, “Self-Improvement”) |
Curated Approach
You can also use a different method when grouping web content per topic. Instead of using Dataview, you can manually link the web content note using the double brackets [[]] or Wikilinks.
This method works best if you want a more curated approach when grouping web content.
For example, let’s say I have a note called “Art and Illustration Making”, I would populate it with links relating to art and illustration and format it based on the topic that they are covering.
Download the Sample Vault

I’ve created a vault that includes example web articles and videos to try this workflow for yourself! You can find it in this GitHub link. The vault has the Dataview and QuickAdd plugins installed.
To download and open the vault in Obsidian, follow the instructions below:
- Click on this GitHub link to take you to the download link.
- Select the latest version of the WebContentLibrary.zip file and download it to your computer.
- Unzip the file.
- On Obsidian, click on the vault icon and press the Open button.
- Select the Web Content Library folder to open it as a vault in Obsidian.
Credits
- blacksmithgu: Dataview Plugin
- chhoumann: QuickAdd
- deathau: MarkDownload
- Cal & Amy: Thread Reader
- Kazuki Nakayashiki & Kei Watanabe: Glasp
If you found this helpful, consider supporting me on Ko-Fi!

